01 — Potential
The line and label appear on the bar the second oscillator pivot settles, one pixel wide, suffixed with a question mark. If alerts are on, the Potential alert fires here carrying direction, type and score.
Every tick is classified as buying or selling, each side is smoothed, and the difference between them is plotted. Divergence is then read off that line's own turning points and the price printed at those bars — not off swing highs and lows in price. Each one is drawn the moment it qualifies, scored 0–100, and marked Potential until control actually changes hands.
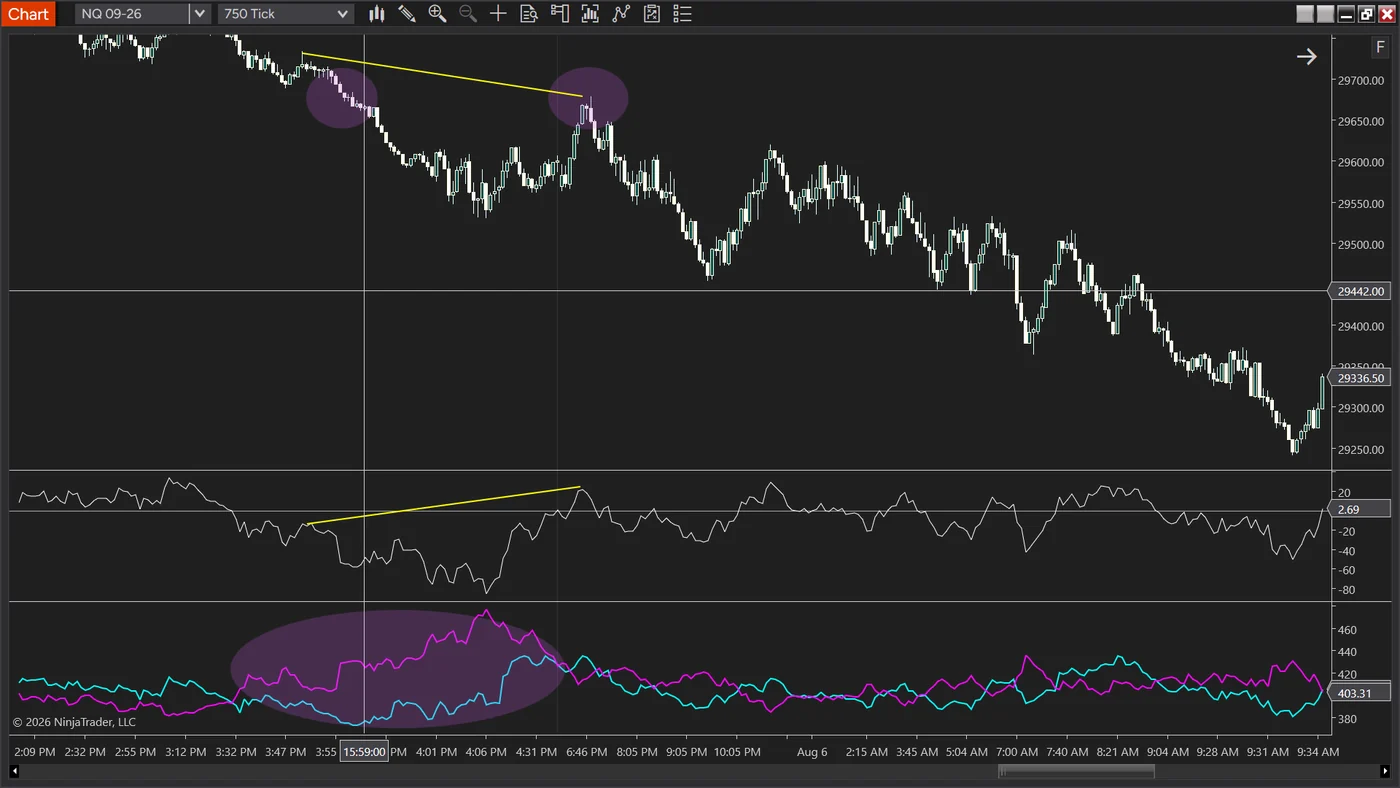
NQ 09-26 on 750-tick bars. The yellow annotation joins the same two bars in both panels: the second high in price prints below the first, while the second high in net aggression prints above it and crosses zero on the way. Lower high in price, higher high in initiative — hidden bearish. The middle panel is the indicator's own plot on its default source, buy minus sell, marked 2.69 at the right edge. The panel below carries the buy and sell lines separately, and the highlighted stretch runs from one crossover to the next — the same event the engine waits for when it promotes a divergence from Potential to Confirmed.
Almost every divergence tool ever shipped works the same way. It finds a swing high in price, finds the swing high the indicator made near it, and compares the two. Everything downstream then rests on what you decided a swing is — three bars either side, five, a fractal, a percentage on a ZigZag. Change that number and divergences appear and disappear.
This engine never looks for a swing in price. It looks for turning points in the aggression line itself — a bar whose oscillator value is strictly above, or strictly below, the three bars on each side of it — and records the price that printed at that bar. A divergence is a comparison between two of those records. Price is a value sampled at a moment the oscillator chose, not a structure that has to finish forming first.
A swing high is only a swing high once enough bars have printed to its right for the definition to hold, and how long that takes is whatever the market gives you. Until it holds, the tool is either silent or showing you something that can still be taken back. The disagreement may have been visible in the tape long before the structure that is supposed to describe it finished.
The oscillator pivot settles three bars after the turn, and the pair is evaluated on that bar — a fixed, short, known wait regardless of what price is doing. The only demand made of price is that the two sampled prices sit at least four ticks apart, which exists to stop the engine drawing a line across a flat. So a divergence here can sit between two bars that no swing routine would have marked at all.
A qualifying pair is drawn straight away — regular divergence solid, hidden dashed, on the oscillator panel — with a question mark on its label. That is a Potential divergence: the disagreement is real and measured, but nothing has changed hands yet. The engine then watches a fixed window for the market to act on it.
The line and label appear on the bar the second oscillator pivot settles, one pixel wide, suffixed with a question mark. If alerts are on, the Potential alert fires here carrying direction, type and score.
For the next ten bars the engine looks for either of two events in the divergence's own direction: the buy line crossing above the sell line, or the net line crossing zero. Either one counts. A bearish divergence needs the mirror of both.
On a transfer the same drawing is rewritten in place: question mark becomes a tick, the line doubles in width, and twenty points are added to the score, capped at 100. A Confirmed alert fires.
If the window closes with no transfer, the question mark is simply dropped. The divergence stays where it is at its base score — neither confirmed nor deleted, because the disagreement it recorded still happened. No line ever moves off the two bars it was drawn between; old ones are cleared as new ones arrive, under a retention limit you set.
The score is the average of two halves, each clamped at 100 before they are blended. The price half is how far apart the two sampled prices are, measured against four times the minimum price swing — sixteen ticks by default earns full marks. The oscillator half is how far apart the two oscillator values are, measured against half the largest absolute reading the line has produced in the last hundred bars.
That second half is why the number travels. It is normalised to the oscillator's own recent range, so an identical raw imbalance scores lower in a session that has been throwing bigger ones around. A high score means a wide price separation and a disagreement that is large relative to how large this line's swings have actually been lately — not large in absolute contracts.
Turned on, a dotted line runs from the last settled oscillator pivot to the current bar, showing the divergence that exists if the bar closes here. It is cleared and redrawn every bar, so it repaints by design — it is the only line on the chart whose endpoints can move. One high-side line and one low-side line at most.
Applies to hidden divergence only. With it on, a hidden bullish signal is suppressed unless price is above where it closed fifty bars ago, and a hidden bearish one unless it is below. Regular divergence is untouched by it.
Two modes, and neither bites until Strict is ticked. Net line requires the net to still be on the side the divergence argues against — positive for bearish, negative for bullish. Buy/sell control requires the dominant side to have stopped growing on that bar. Regular divergence only.
Potential and Confirmed are separate toggles over four separate sound slots, so a bullish confirmation can be a different noise from a bearish potential. The message carries direction, status, type and score, and each divergence raises at most one of each.
The divergence is the disagreement; the transfer is the evidence that anyone acted on it. Most useful where the second reading lands on a level Volume Profile has already marked, or where the ladder is showing the same stall. Read the score as a size rather than as an instruction — it says how large the disagreement was, not what to do about it.
Requires NinjaTrader 8. OF-TA-DIV-001